
さて、最終の第3回です。いよいよフォトショップの機能にコーディングしていきます。参考は下記URLより。
Photoshop API
ドキュメント操作
ドキュメントを開く
前回に引き続き、2つ目のボタン【open Document】(ID:btn2)にクリックイベントを追加します。
- CEPのサンプルコード
const csInterface=new CSInterface();
document.getElementById("btn2").addEventListener("click",function(){
    const myDocmentDir=csInterface.getSystemPath(SystemPath.MY_DOCUMENTS);
    const openFile=window.cep.fs.showOpenDialogEx(false,false,"open File",myDocmentDir.toString(),["psd"]).data.toString();
    if(openFile!=""){
        csInterface.evalScript("openDocument('"+openFile+"');",function(myDoc){
            if(myDoc!="false"){
                console.log("openDocument - success!",myDoc);
            }else{
                console.log("selectFile - null");
            };
        });
    };
},false);
- ExtendScript部分(jsx)
function openDocument(openFile){
    var openFileObj=new File(openFile);
    if(openFileObj){
        var myDoc=app.open(openFileObj);
        return myDoc.fullName;
    }else{
        return false;
    };
};
3行目から解説を、ドキュメントフォルダを取得してファイル選択ダイアログでpsdファイルを選択させます。
const myDocmentDir=csInterface.getSystemPath(SystemPath.MY_DOCUMENTS);
const openFile=window.cep.fs.showOpenDialogEx(false,false,"open File",myDocmentDir.toString(),["psd"]).data.toString();
続いてExtendScriptの関数[openDocument]を呼び出します。返り値はドキュメントのフルパスを[myDoc]にして返します。
csInterface.evalScript("openDocument('"+openFile+"');",function(myDoc){
    if(myDoc!="false"){
        console.log("openDocument - success!",myDoc);
    }else{
        console.log("selectFile - null");
    };
});
ExtendScript部分の説明は割愛します。
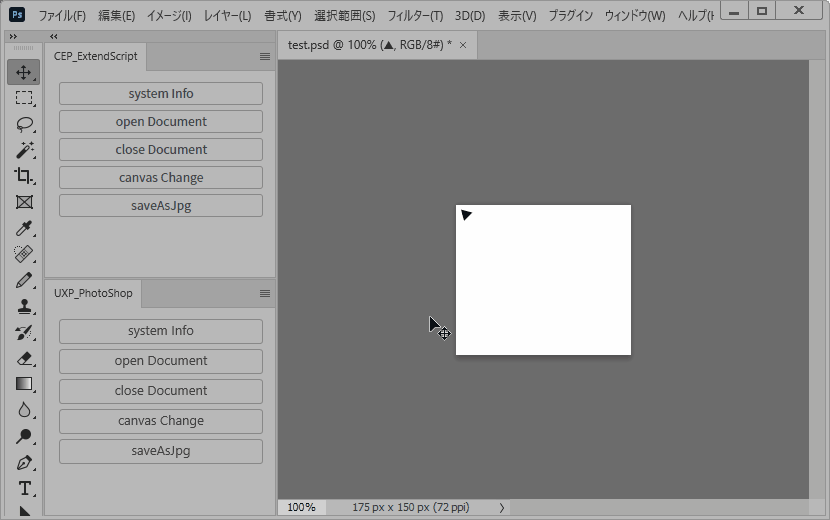
実行結果:openDocument - success! ~/Documents/test.psd
成功すると、フォトショップは選択したファイルを開きます。
const uxp=require("uxp");
const fs=uxp.storage.localFileSystem;
const app=require("photoshop").app;
const PhotoshopCore=require("photoshop").core;
document.getElementById("btn2").addEventListener("click",function(){
    PhotoshopCore.executeAsModal(async()=>{
        const myDesktop=uxp.storage.domains.userDesktop;
        const openFile=await fs.getFileForOpening({initialDomain:myDesktop});
        if(openFile!=null){
            var myDoc=await app.open(openFile);
            console.log("openDocument - success!",myDoc.path);
        }else{
            console.log("selectFile - null");
        };
    },{"commandName":"openDocument"});
},false);
こちらも3行目から解説を、まずはフォトショップを操作するため【require(“photoshop”).app】で呼び出します。
【require(“photoshop”)】では不十分です。その後、【app.app】しちゃいますよ?
const app=require("photoshop").app;
今度は【core】を呼び出します。これはフォトショップ2022を操作するのに必須の【ExecuteAsModal】を使用する為です。この辺りは下記を参考にしました。
ExecuteAsModal
const PhotoshopCore=require("photoshop").core;
続いて5行目なのですが、【core】から早速【ExecuteAsModal】を呼び出します。ついでに【await】を使用する為の【async】無名関数を合体させてました。如何でしょうか?
PhotoshopCore.executeAsModal(async()=>{
 ->フォトショップの処理
},{"commandName":"openDocument"});
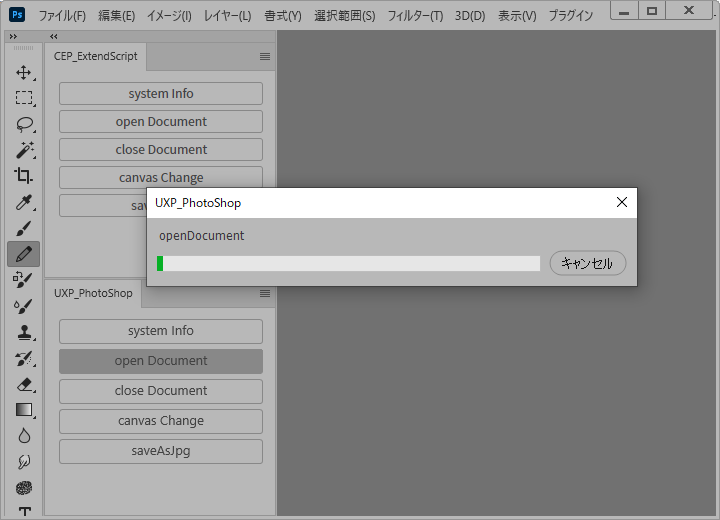
んで閉じる方の処理の【commandName】ですが、【ExecuteAsModal】は処理に時間が掛かるとプログレスバーを表示してくれるのです。現在は2秒以上の処理らしいです。そのコマンド名になります(ウィンドウ名はプラグイン名)。キャンセルもできるようなのですが、まだ調べ中です。
んで7、8行目は前回説明済のファイル選択。9行目は選択したかどうかのif文。
const myDesktop=uxp.storage.domains.userDesktop;
const openFile=await fs.getFileForOpening({initialDomain:myDesktop});
if(openFile!=null){
 ->選択ファイルの処理
};
やっとこ10行目に【ExtendScript】を使用しない【UXP Photoshop API】的ファイルオープン処理がドドンと登場!
var myDoc=await app.open(openFile);
実行結果:openDocument - success! C:\Users\shock-tm\Documents\test.psd
成功すると、フォトショップは選択したファイルを開きます(プログレスバー付)。
アクティブドキュメントを取得して閉じる
お次はアクティブドキュメントを取得して閉じる処理をしてみます。
- CEPのサンプルコード
const csInterface=new CSInterface();
document.getElementById("btn3").addEventListener("click",function(){
    csInterface.evalScript("closeDocument();",function(bool){
        console.log(bool);
    });
},false);
- ExtendScript部分(jsx)
function closeDocument(){
    try{
        var myDoc=app.activeDocument;
        var myDocName=myDoc.name;
        myDoc.close();
        return "closeDocument - success! "+myDocName;
    }catch(e){
        return "activeDocument - null";
    };
};
閉じる方は簡単ですね、ExtendScriptの関数[closeDocument]を呼び出します(ExtendScript部分の説明は割愛!)。
実行結果:closeDocument - success! test.psd
const app=require("photoshop").app;
const PhotoshopCore=require("photoshop").core;
document.getElementById("btn3").addEventListener("click",function(){
    PhotoshopCore.executeAsModal(async()=>{
        var myDoc=app.activeDocument;
        if(myDoc!=null){
            var myDocName=myDoc.name;
            myDoc.close();
            console.log("closeDocument - success!",myDocName);
        }else{
            console.log("activeDocument - null");
        };
    },{"commandName":"closeDocument"});
},false);
UXPも閉じる方は簡単です。5行目から解説を、まずアクティブドキュメントを取得します。
var myDoc=app.activeDocument;
そんで6行目は閉じる処理。この辺は【ExtendScript】と変わらんですね。
myDoc.close();
実行結果:closeDocument - success! test.psd
ドキュメント変更・書出
カンバスサイズの変更
いよいよドキュメントに対する指令を行ってみます。手始めにカンバスサイズを変更してみます。
- CEPのサンプルコード
const csInterface=new CSInterface();
document.getElementById("btn4").addEventListener("click",function(){
    csInterface.evalScript("canvasChange(75,50);",function(bool){
        console.log(bool);
    });
},false);
- ExtendScript部分(jsx)
function canvasChange(addWidth,addHeight){
    try{
        var myDoc=app.activeDocument;
        myDoc.resizeCanvas(myDoc.width+addWidth,myDoc.height+addHeight,AnchorPosition.TOPLEFT);
        return "canvasChange - success!";
    }catch(e){
        return "activeDocument - null";
    };
};
ExtendScriptの関数[canvasChange]を呼び出します。サイズ変更の起点を左上(定数[AnchorPosition.TOPLEFT])にしてみました。
実行結果:canvasChange - success!
const app=require("photoshop").app;
const PhotoshopCore=require("photoshop").core;
document.getElementById("btn4").addEventListener("click",function(){
    PhotoshopCore.executeAsModal(async()=>{
        var myDoc=app.activeDocument;
        if(myDoc!=null){
            var width=await myDoc.width;
            var height=await myDoc.height;
            await myDoc.resizeCanvas(width+75,height+50,"top-left");
            console.log("canvasChange - success!");
        }else{
            console.log("canvasChange - null");
        };
    },{"commandName":"canvasChange"});
},false);
ではUXPは7・8行目から解説を、まずは高さと幅を取得。
var width=await myDoc.width;
var height=await myDoc.height;
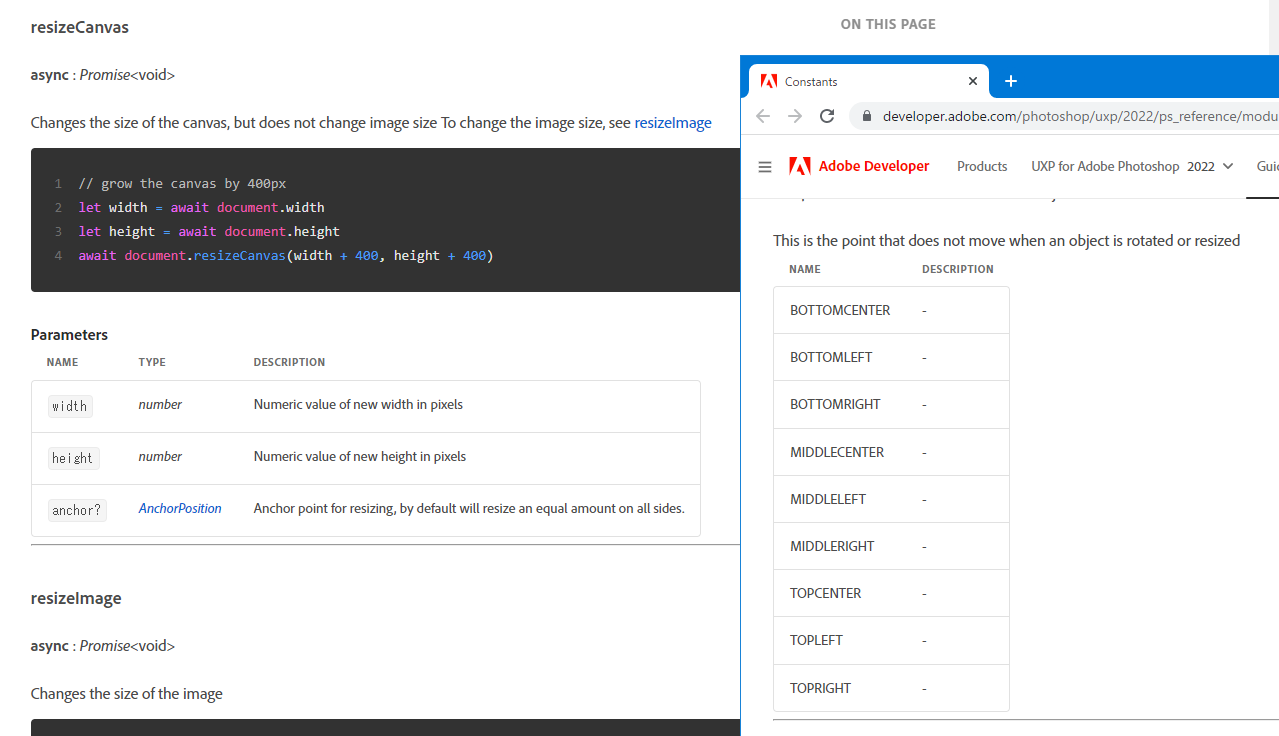
そんでここの公式を参照してカンバスサイズを変更します。
await myDoc.resizeCanvas(width+75,height+50,"top-left");
問題は3つ目の引数[anchor]ですが、公式ではAnchorPositionの【定数】との記述があるのですが、手当たり次第にやってみても全然言うこと聞いてくれませんでした。
しかし、ここの書き込みを参照すると[top-right]などの文字列で動作することが分かりました。
Based on the docs, I believe it’s just a string.
(ドキュメントに基づくと、それは単なる文字列だと思います。)
そんなん分かるわけないやろ!どこどう見たらそうなんの?TYPE=AnchorPosition!TYPE=AnchorPosition!
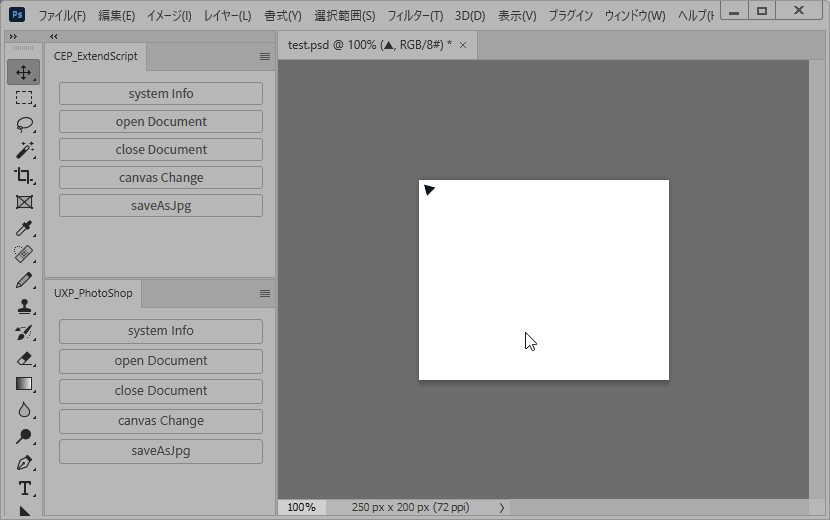
ちょっと取り乱しましたが、[top-left]を記述して無事に動作。実行結果は下記になります。
実行結果:canvasChange - success!
jpgファイルの書出
最後はjpgファイルの書出を行いたいと思います。
- CEPのサンプルコード
const csInterface=new CSInterface();
document.getElementById("btn5").addEventListener("click",function(){
    const myDocmentDir=csInterface.getSystemPath(SystemPath.MY_DOCUMENTS);
    var saveFile=window.cep.fs.showSaveDialogEx("save Jpg",myDocmentDir,["jpg"],"newJpgFile.jpg");
    var saveFilePath=(saveFile.data.toString()).replace(/\\/g,"/");
    csInterface.evalScript("saveAsJpg('"+saveFilePath+"');",function(bool){
        console.log(bool);
    });
},false);
- ExtendScript部分(jsx)
function saveAsJpg(saveFile){
    try{
        var myDoc=app.activeDocument;
        var saveFileObj=new File(saveFile);
        var exportOptions=new ExportOptionsSaveForWeb();
        exportOptions.format=SaveDocumentType.JPEG;
        myDoc.exportDocument(saveFileObj,ExportType.SAVEFORWEB,exportOptions);
        return "saveAsJpg - success! "+saveFileObj.name;
    }catch(e){
        return "activeDocument - null";
    };
};
まず【CEP】で保存先ファイルを決定します(2、3行目)。
const myDocmentDir=csInterface.getSystemPath(SystemPath.MY_DOCUMENTS);
var saveFile=window.cep.fs.showSaveDialogEx("save Jpg",myDocmentDir,["jpg"],"newJpgFile.jpg");
そんで4行目ですが、第2回でもお知らせしましたが、取得できたパスの区切りが【\】なので、このままExtendScriptに渡すとヤヴァいので【/】に置換します。
var saveFilePath=(saveFile.data.toString()).replace(/\\/g,"/");
そして置換したパスをExtendScriptの関数[saveAsJpg]に引数にして呼び出します。※またしてもExtendScript部分の説明は割愛!
実行結果:saveAsJpg - success! newJpgFile.jpg
const uxp=require("uxp");
const fs=uxp.storage.localFileSystem;
const app=require("photoshop").app;
const PhotoshopCore=require("photoshop").core;
document.getElementById("btn5").addEventListener("click",function(){
    PhotoshopCore.executeAsModal(async()=>{
        var myDoc=app.activeDocument;
        if(myDoc!=null){
            const myDesktop=uxp.storage.domains.userDesktop;
            const newFile=await fs.getFileForSaving("newJpgFile.jpg",{
                initialDomain:myDesktop,
                types:["jpg"]
            });
            myDoc.saveAs.jpg(newFile,{quality:12},true);
            console.log("saveAsJpg - success! "+newFile.name);
        }else{
            console.log("activeDocument - null");
        };
    },{"commandName":"saveAsJpg"});
},false);
こちらがUXPのサンプルコードです。ファイル保存は第2回でもやってますね。今回はjpg形式に合わせるだけです。
const myDesktop=uxp.storage.domains.userDesktop;
const newFile=await fs.getFileForSaving("newJpgFile.jpg",{
    initialDomain:myDesktop,
    types:["jpg"]
});
14行目がjpg保存のコードです。公式を参照。引数は「File, SaveOption, asCopy」です。
myDoc.saveAs.jpg(newFile,{quality:12},true);
[SaveOption]は保存形式ごとに違ってるので、Json方式になってますね。
実行結果:saveAsJpg - success! C:\Users\shock-tm\Documents\newJpgFile.jpg
書き出しが動かない?
んで、ですね。なんでか最初全然jpgファイル書き出せなかったんですわ。結構悩んで、なんでかな思ったら[saveAs]の機能がCC2022かららしく、アプリケーションのバージョンに依存するんじゃなくて【manifest】の[minVersion]に依存するみたいです。なので第1回で[Host Application Version]を[22.0.0]にしたところから躓いていました。
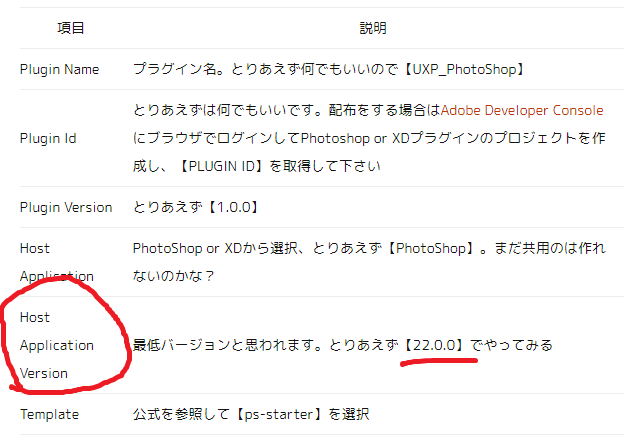
開発途中でのバージョンの変更方法は、開発中のプラグインフォルダ内の【manifest.json】ファイル内の[minVersion]の値です。

【23.0.0】に変更すれば、無事に動きました。
2022でだいぶ機能追加があったらしく、公式も微妙なアドレス違うドキュメントが3つ程ありました。
Photoshop API Reference (developer.adobe.com 2022)
Photoshop API Reference (developer-stage.adobe.com こっちも2022?)
Photoshop API Reference (developer 古い?)
まぁ、一番上が良さそうな感じですね。
まとめ
まぁ触りということで、CEPと比較しつつ勉強してみました。他にもファイルはエントリーするものだとか、パネルだけではなくメニューコマンドに出来たり、アプリケーション側の色々なイベントを補足が出来たり、【batchPlay】なるものでPhotoshopに命令を与えたりできる模様です。まぁそれに関しては、おいおいということで、、、。
今回触った感じ、もしも【ExtendScript】が使用できるようになれば、【CEP】よりも格段に開発しやすそうですね。今んとこPhotoshopとXDだけですが、、、。
公式のどこかのページで「【ExtendScript】の実行スクリプト開発中です!」って記述されてたような、、、。
スポンサーリンク
More from my site
 次世代プラグイン開発環境【UXP】(Unified Extensibility Platform)を本格的に学んでみた。【CEP】との比較もしてみました 2/3
 UXPプラグイン第2弾リリース!CEPエクステンション「QR Checker」をUXPに移植した「QR Toolkit」シリーズ!まずはPhotoshop版から
- 次世代プラグイン開発環境【UXP】CEP時代から悩まされていたカラーテーマのライト・ダーク切り替え問題がついに解決した!
- 次世代プラグイン開発環境【UXP】(Unified Extensibility Platform)を本格的に学んでみた。【CEP】との比較もしてみました 1/3
スポンサーリンク